-
When you click on links to various merchants on this site and make a purchase, this can result in this site earning a commission. Affiliate programs and affiliations include, but are not limited to, the eBay Partner Network.
You are using an out of date browser. It may not display this or other websites correctly.
You should upgrade or use an alternative browser.
You should upgrade or use an alternative browser.
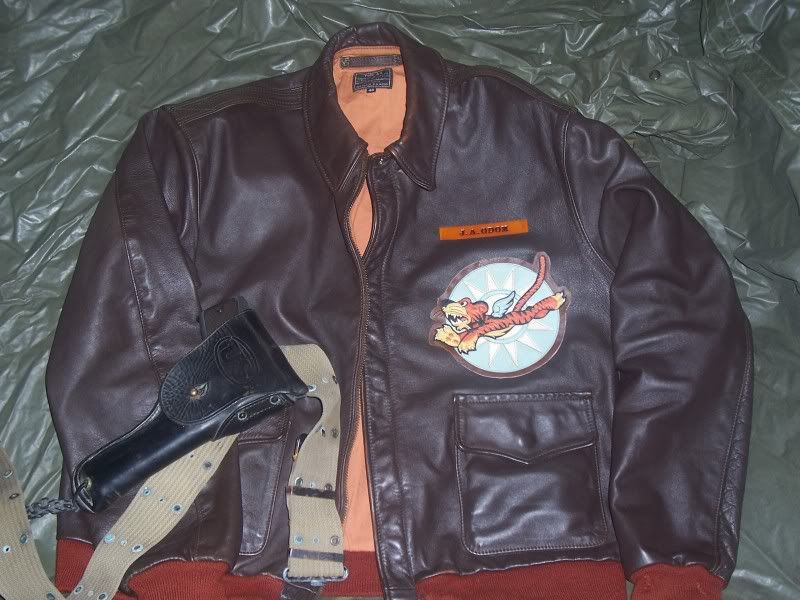
Test pic.~ Aero A2
- Thread starter JOHNO
- Start date
Silver Dollar
New Member
RCSignals said:Looks OK to me except I'd turn the patch Slightly (clockwise) so the tiger is heading up
Agreed. The tiger should always be on the rise.
a2jacketpatches
Active Member
Actually fellas, the patch is designed with the tiger rising slightly, I put him on there to stitch by eyeballing the vertical and horizontal points on the China Sun. The patch should be as if a clock, with 12 and 6 perfectly vertical.
a2jacketpatches
Active Member
No knock taken at all, just a rule of thumb I use during construction that seemed appropriate here. I should probably mention it in the listing for these, along with some getting it stitched on advice.
a2jacketpatches
Active Member
Just tack it on with some Elmers glue, spread evenly around the back perimeter apply when tacky and iron low setting. That'll keep it in place. It is also very important to make sure the liner doesn't get stitched out of place. A few hand stitches around the patch where it'll be finish stitched making sure the liner is perfect, then just do the finish stitches right over it. Remove the temp stitches when done ( do them a different color like red so easy to see )JOHNO said:I'll take all the stitching advise I can get!
shedonwanna
Active Member
a2jacketpatches said:Just tack it on with some Elmers glue, spread evenly around the back perimeter apply when tacky and iron low setting. That'll keep it in place. It is also very important to make sure the liner doesn't get stitched out of place. A few hand stitches around the patch where it'll be finish stitched making sure the liner is perfect, then just do the finish stitches right over it. Remove the temp stitches when done ( do them a different color like red so easy to see )JOHNO said:I'll take all the stitching advise I can get!
I like to use rubber glue. It's easy to sew through and allows pieces to be pulled apart and repositioned if needed. Thinly applied you don't get lumps in the finished product. Standard product in leather craft for holding pieces together while lacing or sewing. Easy clean up too.
a2jacketpatches
Active Member
One reason I do is because sometimes the jacket leather and patch leather are so squishy that the foot of my machine causes a wave in front as it pushes forward. If lightly tacked to each other with whatever works, and lubed on top with my special sauce for the foot to glide on, problem eliminated. The foot loses the friction to push a wave in front of it, and the leather resists whatever push is left in the foot. Hand stitching is a different story.CBI said:Why any glue, never had problems with just sewing it on.
Silver Dollar
New Member
I generally use Sobo glue and then do the sewing. Otherwise, I've got leather pieces all over the place. I don't use a special sauce but Im pretty sure it would definitely help me. I just did my first 14 piece patch. The second attempt turned out a lot better than the first which I seemed to have conveniently lost.

